Front Worksheet: Difference between revisions
| Line 52: | Line 52: | ||
[[Image:Front_landspeed.gif|frame|right|The Land Speed section]] | [[Image:Front_landspeed.gif|frame|right|The Land Speed section]] | ||
The Speed section will display the total speed of your character, computed from your base speed, gear effect, class bonuses and epic bonuses. You can use the Misc cell to adjust your speed for special situations (like boots of speed). | The Speed section will display the total speed of your character, computed from your base speed, gear effect, class bonuses and epic bonuses. You can use the Misc cell to adjust your speed for special situations (like boots of speed). | ||
| test | :| test | ||
|} | |} | ||
Revision as of 20:58, 7 July 2006
The FRONT worksheet is the primary worksheet used in Character creation. It is there that your Character comes to life. It is also the primary page you should print for your Character (assuming you do not use a Laptop to play dynamically.)
There are several sections to the FRONT worksheet.
The Front Worksheet (Printed)
The Front worksheet has two main sections: One which is printed, and an off-sheet section, used to enter aditionnal informations. Lets start with the printed section:
The Class Section

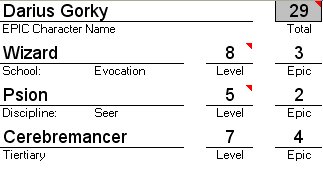
The Class section contains your Character's name, its total levels and then a breakdown of all classes and class levels, including Epic levels. The sheet allows creation of Godlike Characters which exceed the 20 level limit defined in the Player's Handbook. To create an Epic Character, first you must fill out all levels so that the total is exactly 20. Once that is achieved, you can add class levels ONLY in the Epic level section.
The image shows an Epic Character named "Darius Gorky". Note that the non-Epic Class levels total exactly 20 (8+5+7). So new levels are added to the "Epic" levels. The Total class level of any Epic character, is the sum of both "Level" and "Epic" levels - in this example, that character is a 8th level Wizard (Evoker), a 5th level Psion (Seer), and a 7th level Cerebremancer. When either a Wizard of Psion class is selected, the School or Discipline must be specified ("Evocation" and "Seer" in this case). While a Psion must have a discipline, you can select "None" for the Wizard's school to have a non-specialized Wizard (we will get back to Wizards in a moment). The gray box at the top left of this image is the Total character level. The little red triangles are comments: In Excel, if you stop your cursor on a cell with one of those red triangles, a comment box will appear. Read it at least once - comments are meant to HELP you understand the Sheet better.
This is a good time to explain how to fill the Sheet: Gray areas are places where the Sheet has a formula which computes something. Except for a few cases [which will be mentioned as we go along], you cannot change the content of the gray areas. For instance, in the previous image, the "29" is presented in a gray box and is the sum of all levels (Non-Epic + Epic). White areas and white boxes are places where you can enter data [and formulas!] [Entering a non-valid value will most likely result in an error message being displayed]. There are several types of input zones: You are now familiar with the line & descriptor below it (like "Level"). In the case of Class selection, a list box showing all the available classes will popup allowing you to make your selection [Do I need to specify you have to 'click' in a cell to make it the active cell?]. Cells like the "Level" in the example above, will accept only numbers, or else an error will be reported

Red text is used to indicate an error condition which appears in The Sheet. For instance, if you select the Wizard class, The Sheet will display "School?" in red, as shown on the image on the right. Basically, for Wizards, The Sheet needs to know if you're going to be a specialist wizard of not. The Yellow area is always used to indicate an input zone (where you can enter data). In this case, if you click in the yellow area, you can activate a list box [click on the gray arrow that appears] which displays available schools of magic. If you are not creating a specialist wizard, select the "None" option. once you have made your choice, the red will disappear and so will the yellow area.
The XP section: The Experience section (XP) displays the total number of XP for the character, as entered in the XP Worksheet. Note that if you create an NPC, you can directly override the XP formula by the amount you wish (or simply ignore it!!) - In this case, the background where the XP are displayed is going to switch to white (to indicate the forumla has been overridded!) |
The Hit Points Section

The HP section displays the total Hit Points your character has. The Hit Point themselves are entered on the XP Worksheet. You can adjust this value simply by using the "Adj." box provided. The section on the right is for use by those who wish to "mark off" lost experience points - again using a transparency and water soluble pen, this becomes even more useful (and re-usable!). Check the Advanced page for information on how to tweak the numbers used to produce the current Hit Point breakdown.
The Speed SectionThe Speed section will display the total speed of your character, computed from your base speed, gear effect, class bonuses and epic bonuses. You can use the Misc cell to adjust your speed for special situations (like boots of speed).
|
The SR Section
Indicate any Spell Resistance your Character has from any sources.
The DR Section
The Leadership Section
The Armor Check Penalty Section
The Saving Throws Section
The Base Attack Section
The Melee/Ranged attack Sections
The ATTACK Sections
There are 6 attack sections available in the FRONT worksheet. These are useful to define the weapon 'load out' of your character. You can use as little or as many as you wish for your Character. The first two Attack sections are "linked" together in case you are using the two-weapon fighting technique.
The Attack mode
The Attack mode is how you are using your weapon. It is composed of two parts; the first part is the Full/Single Attack selection - If you click on the "FULL ATTACK" (as seen on the image on the right), you will see a list box appear in which you can select either Full Attack or Single Attack. Basically, the Full attack will tell the Sheet you wish to see all available attacks from the selected weapon. The Single Attack selection will tell the Sheet you only wish to see ONE attack from that weapon. What is the difference you might ask? Well, sometimes you might want to see your attack total, without any penalties applied from multiple attacks: For instance, lets say you use a bow and have a ranged attack of +5. If you add the feat "Rapid Shot", you will get an extra attack, so the sheet will show "+3/+3" to indicate you have 2 attack, but include a -2 penalty from the rapid shot feat. If you then decide to switch to "Single Attack", you will see your attack back to +5 (ignoring the extra attack from the Rapid Shot, and it's penalty).
The second part of the Attack mode, is how you are holding your weapon - your choices are listed if you click on the "two-weapons (primary)" as shown on the right:
- One-Handed: Melee weapon used with only one hand
- Two-Handed: Melee weapon used in two-hands. Note that the weapon must have a strength multiplier higher than 1.0 to benefit from the 50% strength bonus as defined in the rules.
- Two-Weapons (primary): Melee weapon used with the primary hand, while the off-hand holds the second weapon (defined in the second attack section). Available only in the first attack section.
- Two-Weapons (off-hand): Melee weapon used in the off-hand. Available only in the second attack section.
- Ranged: Ranged weapon (the Ranged attack bonus will be used instead of the Melee attack bonus)
- Double Weapon: The weapon is to be used as a Double weapon (ex: Gnome Hooked Hammer)
The Weapon
Here you select the weapon you wish to use. Note that when you click this cell, the list box arrow becomes visible and can be clicked to show the list of all defined weapons. The custom weapons you define will always be shown at the end of this list.
The Range
For any weapon with a range, this is where the range increment is listed. Note that if you have the "Far Shot" feat, the Sheet will automatically adjust your range increment accordingly.
The Damage Type
Indicated the type of damage the weapon causes.
The Description
Flavor description for the weapon
The Note
Allows you to enter notes for that weapon - you can use it to track ammunition for projectile weapons!
The Adjustments
The Sheet allows you to modify the attack and damage of a weapon. Simply enter the new values for those as needed. For instance, if you have a +2 long sword, simply place '2' in both Attack Adj. and Damage Adj.
The Total Attack and Damage
Displays, for your selected weapon, the total attack and the total damage. Note that this number is the sum of all bonuses and penalties incurred. As mentioned previously, if "Single Attack" is selected, some penalties will not be included. When "Full Attack" is selected, the Sheet will display all of your attacks, if you have more than one, using the 'slash' character between each attack number (i.e. +2/+2/+2 which means 3 attacks at +2 each).
The Critical
The Sheet lists the critical threat range and the critical damage multiplier. Note that if the character has the "Improved Critical" feat, the Sheet will automatically adjust the threat range as needed.


