Advanced - Custom Data: Difference between revisions
No edit summary |
|||
| Line 34: | Line 34: | ||
=== Testing === | === Testing === | ||
To make sure we made no errors, open a new instance of the Sheet (or reset your character) and use the '''Load Data''' button on the [[Control Worksheet|Control worksheet]]. Navigate to the file you just created, and select it. Now, check the Back worksheet to see if all your data is present! | To make sure we made no errors, open a new instance of the Sheet (or reset your character) and use the '''Load Data''' button on the [[Control Worksheet|Control worksheet]]. Navigate to the file you just created, and select it. Now, check the [[Back Worksheet|Back worksheet]] to see if all your data is present! | ||
Revision as of 17:46, 18 July 2010
Introduction
Starting in TOS+ version 3.5, a new function has been added to allow users to load custom data directly in a Character. This can be most useful to add custom content to an existing character, or to start off new characters with a 'package' of custom data, already prepared. In this section, we will use an example of custom data to explain how this can be created for TOS+.
The Adventurer's Basic Gear
When you create a character, you always take a Basic package of gear for your character. The standard way to do this would be to visit the Back worksheet, and enter each item that you want in your Basic Package. But if you plan on making many Characters with the same Basic Package, you could use the Sheet's ability to Load custom Data to go about this faster.
We will use the Example of the Basic Package to walk you through this process - which could be applied to other areas as well... things like Feats, Spells, custom weapons etc!
Create the Data

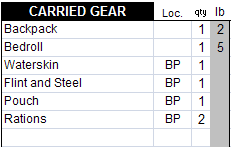
The first step is to create the data. Using the Back worksheet, I have created this Basic Package for my characters (seen on this image on the right). It contains the items I like to start characters with. I tagged with the BP tag those items that are located in my backpack.
Save the Character
Now that we have some Data to use, we need to save this so that we can prepare it to become Custom Data. Use the Save Character button of the Control worksheet and use whatever name and folder that you can find with explorer. This will create a file with the .tos extension. Note that you could even use an existing character that already has the gear you want as opposed to re-creating it from scratch.
Edit the Data
Using the file explorer, open your .tos file with your preferred editor. I use Wordpad. The output of the Sheet is actually a text file that just has the .tos extension, as opposed to the .txt extension.
The .tos file is separated in section using headers in the same manner as the standard .ini files. Now, since the Data we are looking for was created on the Back worksheet, we need to find where this section starts - search for [Back]. With your editor, delete everything ABOVE that section, as we won't need that. Then, find the NEXT section that follows the back section, and delete that section and everything after that (in my case, the [Customize] is after the [Back] section.
Now that we have eliminated all the other sections, we can concentrate on the section we isolated. If you check the remaining named cells, you will be able to identify the relevant sections as tSel_BackGear*. Removing the other named cells, we are left with this:
[BACK]

tSel_BackGear1=23|1|Backpack|Bedroll|Waterskin|Flint and Steel|Pouch|Rations|||||||||||||||||BP

tSel_BackGear1Loc=23|1|||BP|BP|BP|BP|||||||||||||||||

tSel_BackGear1Qty=23|1|1|1|1|1|1|2|||||||||||||||||
Saving the Data
Now that we have the data that we seek, use the same option and RENAME the extention to read as .tosdata. This will allows the Load button to better find this file. Close your editor.
Testing
To make sure we made no errors, open a new instance of the Sheet (or reset your character) and use the Load Data button on the Control worksheet. Navigate to the file you just created, and select it. Now, check the Back worksheet to see if all your data is present!